Doing Inspections, Tests, or Observations
In This Tutorial Topics- Selecting your checklist information
- Completing your checklist
- Saving and emailing your checklist and creating punch items
- Completing additional checklists
- Editing or deleting saved checklists
Selecting your Checklist Information
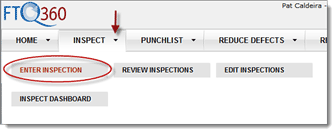
1. Hover over “INSPECT” on the top menu bar.
2. Click “ENTER INSPECTION”.
3. Select a Project/Community.
- To select a Project or Community (This is a Customizable Term), choose one from the available list. Note: You may add additional projects in “SETUP”.

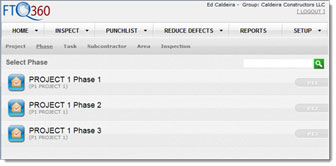
4. Select a Phase/Lot
- To select a Phase or Lot (This is a Customizable Term), choose one from the available list. Note: You may add additional phases in “SETUP”.
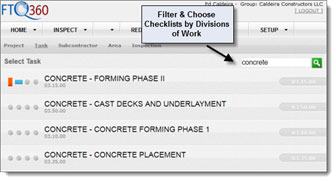
5. Select the Task you’ll be Inspecting, Testing, or Observing
- To select a Task (This is a Customizable Term), scroll down the list or filter using the search feature. Tasks are identified by their CSI Divisions of Work.
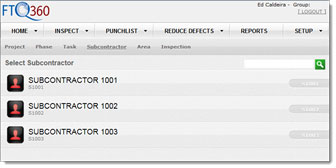
6. Select the Subcontractor/Trade/Vendor that did or is doing the work.
- To select a Subcontractor, Trade, or Vendor (This is a Customizable Term), choose one from the available list. Note: You may add additional subcontractors in “SETUP”.
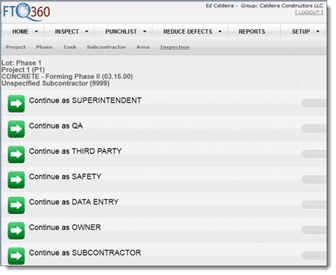
7. Select your Inspector Type. (For Select Users)
- If your user-level includes multiple inspector types, you’ll need to select your Inspector Type for each inspection, choose one from the available list.
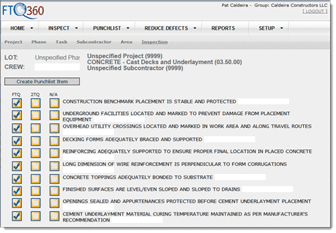
Completing your Inspection Checklist
1. Add Crew Name (Optional)
2. Click 2TQ, N/A, or Leave as FTQ
- FTQ (first time quality) is for completed checkpoints
- 2TQ (2nd time quality) is for incomplete checkpoints
- N/A is when checkpoint does not apply
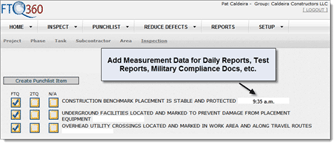
3. Add Measurement Data (Optional)
- For specially formatted reports such as Daily Reports, Test Reports, Observation Reports, or Military Compliance Documents, etc.;
- Examples include weather conditions, test data, dates and/or times samples were taken, etc.
4. Adding Score(s) (Mandatory)
- Add at least one score.
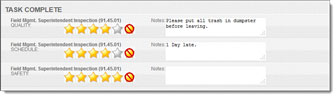
| Recommended scoring: 5 = Perfect, not problems, 100% 4 = Very good, 1-2 minor problems 3 = Good, 3-5 minor problems 2 = Poor, 6+ minor problems, hotspot or major problem 1 = Very poor, excessive problems |
5. Adding Notes (Recommended)
- Add notes for scores less than 5.
- Notes provide valuable information to the subcontractors/vendors doing the work. They also give management insights.
Saving, Emailing, & Creating Punch Items
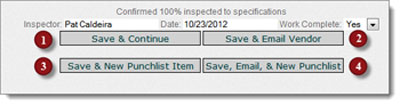
1. Save & Continue
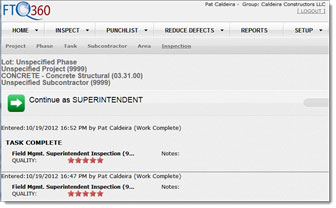
- Saves your checklist and brings you to a TASK COMPLETE screen.
2. Save & Email Vendor
- Saves your checklist, emails a report to the email address associated with this subcontractor, trade, or vendor and brings you to a TASK COMPLETE Screen.
3. Save & New Punchlist Item
- Saves your checklist and starts a Punch Item for this Project, Phase, Task, & Subcontractor.
4. Save, Email & New Punchlist
- Saves your checklist, emails a report to the email address associated with this subcontractor, trade, or vendor and starts a Punch Item associated with this checklist.
Completing Additional Checklists (Time-saving Tip)
1. Click Task to Start a New Checklist
- No need to select Project or Phase when it is the same.
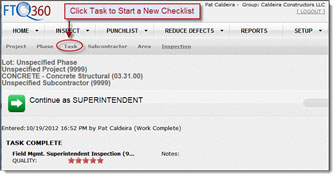
2. Proceed with Steps Outlined Above After Clicking Task.
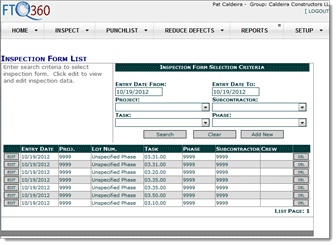
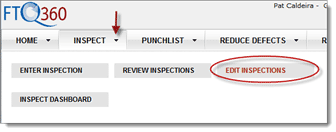
Editing Saved Checklists
1. Hover over “INSPECT” on the top menu bar.
2. Click “EDIT INSPECTIONS”.
3. To Find your Checklist, Choose a Date Range, Project, Subcontractor, Task, or Phase.